I looked into Amazon.com's advertising and found that you can customise a store of your own, called your aStore. I am going to use this to show my crucial gadgets (as I've had a lot).
I think it will be useful to show all the products I absolutely cannot live without. I will add to this as and when I think of more.
I would also be very interested if anyone else has any gadgets and widgets that they can't live without. If I like the idea, I will add it to my list.
Remember - I live in the UK, but I see most of my readers are in the US. Therefore product availability may be a little different, but this is mainly for showing what I like rather than for commercial purposes.
It doesn't display brilliantly below because of the narrow width of my blog. If you fancy seeing the whole thing, click on the title and it will open in a new tab/window.
Thursday, 30 April 2009
Tuesday, 28 April 2009
Question: how do you organise your iTunes library?
Here's one for the commenters: I would like to know how you organise your iTunes library.
I am specifically trying to find out what your playlist structure is like. I'm not talking smart playlists here - I'm interested in your permanent playlists that you use to segregate your music to make it more manageable.
For example, I have about 25,000 tracks and I have bee 'umm'ing and 'err'ing on how best to organise them and structure them for listening (since I want to at least go through all the tracks and chuck out anything I don't like anymore). See this post to see where I've come from and where I'm trying to get to.
My latest 'idea' involves splitting my library into 3 main categories:
- Music I bought on CD before the advent of the mp3 revolution
- Music I have downloaded (and yes, I used Napster back in 2000 and 2001, so please don't judge me)
- Music that was shared with me
I then have sub-categories under this do break the music down a bit more into nice chunks. Here is a screenshot of all my non-smart (thick?) playlists:

I am hoping that this will be a little less overbearing that a huge list of 25,000 tracks. At work, in the car and on my iPhone I have started listening to all the singles I bought on CD (1995 to 2000) which is quite amusing as I haven't heard all this stuff for years. At home we use the Genius function to give us random playlists based on a song we feel like hearing at the time.
I started listening to my entire library at about the same time I started this blog. Let's see how long it takes to get through it all…
Let me know how you organise your library or if you have a better way altogether.
Monday, 27 April 2009
A reverse date prefix file and folder naming convention
I always used to name files and folders randomly. I never followed a particular convention of any sort. One thing I did like to do was to include the date I worked on the file in the file name, but I never thought of this tip until recently - I'm sure it's not a completely original idea, but it makes complete sense to me.
What I now do (for pretty much every file that I work with) is to put the date at the beginning in reverse in this format:
YYYY-MM-DD filename.ext

What this does for me is the following:
- Sorting by the file or folder name quickly sorts chronologically
- Any desktop search you use can quickly search on the date in the title
- I can easily scan through the list of files and see how they interrelate in time
- If I change the date every time I make a change I can see when I last made an update
- Following on from the point above, it enables me to keep a very simple version control system which is extremely easy to maintain
After a long holiday and multiple photos from different cameras, I realised that making a universal slideshow would put everything in the wrong order unless I used a chronological naming convention. Hence I took it a step further and used this format:
YY-MM-DD-HH-MM-SS (orginal photo number).ext

I reduced the year to two digits (to keep the file name a little shorter). I also did away with any description of the photo as it takes too much time to write. The folder gives the date and the general content which is good enough unless you are doing something specific with the photo.
The great thing about this was that using the excellent (and free!) piece of software Bulk Rename Utility, I was able to do this right from the context (right click) menu. But that will be the subject of another post as it really is an indispensable utility for the file-naming-obsessed-geek, albeit a rather complicated looking one on first principles:

If anyone else has any useful hints on file naming conventions they care to add, please let me know in the comments section below as I'm always trying to get more organised. For me, simplicity and effectiveness are the key measures of success.
Friday, 24 April 2009
UK housing market and house prices - educate yourself
Do you want to be 'in the know' before everyone else reading the papers. if so, I have found that the best place to look on the net is the website Home.co.uk, specifically at this page.

The folks at Home.co.uk do a monthly synopsis (in the form of a PDF report) of the housing market, based on their asking price index. They cover a huge amount of the houses being sold in the UK and hence can give a really thorough and up-to-date coverage of the UK housing market state of play:
You can also look at coverage of your specific area at this page.
The folks at Home.co.uk do a monthly synopsis (in the form of a PDF report) of the housing market, based on their asking price index. They cover a huge amount of the houses being sold in the UK and hence can give a really thorough and up-to-date coverage of the UK housing market state of play:
The Home.co.uk Asking Price Index is calculated every month using more than 700,000 UK house prices found in the Home.co.uk Property Search Index. This figure represents the majority of the property for sale on the open market in the UK at any given time. Properties above £1m and below £20k are excluded from the calculations.Typically the media reacts to information supplied to them by estate agents. However, this has to be processed and the lag can be a month or two. Therefore all of this info is way out of date and you may be missing out on recent market developments. If you had the time to constantly monitor the market by regularly viewing properties, you would get a first hand view of your local market. However, this takes a lot of time and if you're merely dipping your toes into the current market trend, you could do a lot worse that to run by Home.co.uk and look at their monthly summary of their asking price index.
You can also look at coverage of your specific area at this page.
Thursday, 23 April 2009
Lyrics in iTunes and on your iPhone - the easy way
UPDATE 5th August 2009: it seems as though the music industry has thwarted us again for no particular reason. They have imposed a ban on the iTunes Lyrics Importer application detailed in this post. Now, when you run the plugin, you get the following returned in your lyrics tag in place of the actual lyrics:
I read somewhere that the iPhone can display song lyrics if they're included in your ID3 tag. I thought 'I gotta get me some of that' and went about finding out the simplest method.
Unfortunately, due to licensing restrictions from some of the major music publishers we can no longer return lyrics through the LyricWiki API (where this application gets some or all of its lyrics).A real shame. Here is the original post, nonetheless:
The lyrics for this song can be found at the following URL:
http://lyricwiki.org/xxxxxxx
(Please note: this is not the fault of the developer who created this application, but is a restriction imposed by the music publishers themselves.)
I read somewhere that the iPhone can display song lyrics if they're included in your ID3 tag. I thought 'I gotta get me some of that' and went about finding out the simplest method.
One thing I had never done with my ID3 tagging was to add lyrics. I thought it would be a time consuming and manual process. I also thought the benefit was outweighed by the tedium of getting it done. Hence I never thought about it until I heard about the iPhone's function. Now I can take music with me and see lyrics whilst I'm mobile [cue images of the tippopotamus singing along to music in the middle of a mall, or not, as the case may be].
This is what it looks like on the iPhone when you tap the album art during music playback:

This process assumes you have no lyrics included at all to start off with. Once you have some lyrics, you then need to be able to find all the tracks which don't have lyrics included. This covers all that as well.
Firstly, you need to download yourself a copy of the simple, yet effective iTunes Lyrics Importer (or iLyrics as it is also known).

Here's the process for getting your library all lyric'ed up…
1. Ensure you have iTunes running
2. Fire up iTunes Lyrics Importer
3. Highlight the all the tracks you want to search for lyrics
4. Press 'Get Lyrics' on the iTunes Lyrics Importer window

I would strongly suggest ticking the box called 'Update Automatically', especially if you have a lot of files to go through - otherwise it will ask you to confirm every track. If you already have some lyrics in your library, leave 'Overwrite' unchecked. I checked it as I had none and wanted to start completely from scratch.
5. Wait while the program accesses LyricWiki and finds if your tracks have lyrics there. If they are included, the software adds them to the Lyrics area in your ID3 tag
For my 25,000 track collection, I left it going overnight and it ran perfectly. A lot of the obscure songs did not get populated, but that was a foregone conclusion. Just over 1000 tracks out of about 25,000 did not get lyrics tagged to them, which is, frankly, amazing. Especially when you realise a lot of them are instrumental tracks.
Now, if you add new music to your library, after following the new music protocol described here and correctly tagging your tracks as shown here, you can simply pick the 'Recently Added' automatic playlist in iTunes and run steps 3, 4 and 5 above.

If you want to re-check the LyricWiki database after some time has elapsed to see if you can get any more lyrics for those tracks it missed first time round, you need to create a playlist of all the tracks without lyrics. Thankfully, that is easy using this iTunes for Windows script from the 'Everything iTunes' website.
Simply download the *.js file and place it somewhere (I put it under my chosen iTunes music folder).


You may find that you don't need the lyrics that much, but to be honest, the process is so simple that you might as well give it a shot.
Defrosting milk the easy way
.jpg) I posted about freezing milk, but how do you go about defrosting it quickly? Leaving it out on the kitchen counter will take a couple of hours. However, there is a shortcut…
I posted about freezing milk, but how do you go about defrosting it quickly? Leaving it out on the kitchen counter will take a couple of hours. However, there is a shortcut… 1. Put your plastic milk container into your kitchen sink (or even better a half-sized side sink if you have one)
2. Run your water until it gets as hot as it will go
3. Put the plug in and fill the sink up so that the milk container is floating (the more water the better, so fill it up as far as you can without risk of overflwoing)
4. Go and do something for (less than) 30 minutes or so and retun to some defrosted milk
This works well because not only does the hot water quickly convect heat from the frozen milk, but it also normalises the temperature between the two fluids and hence keeps the milk cold. Hence, if you forget about it for a while, you can trust that it will have at least kept cold for longer than if you have left it out on the counter.
Freeze fresh milk to always have it at hand
Did you know that you can freeze fresh milk?
I learnt this whilst living in West Africa where the only way of getting fresh milk was having it shipped in from South Africa. It came frozen and we would put it straight in our freezer. We'd buy enough for two weeks to last until the next shipment came in.
Now I am back in the UK, we still freeze milk as it is so convenient. Once it is defrosted, it looks and tastes exactly the same way as it did when it was bought. We have kept frozen milk in the freezer for a few months sometimes.
.jpg)
In the picture above, the frozen milk is on the right. Notice that the container has expanded a bit and it goes a creamy yellow colour compared to the liquid-state milk on the left.
I would suggest freezing milk in plastic containers - this way the container can take the small bit of expansion that occurs during the cooling of the milk. I would also suggest freezing a few different sizes. You at least then have the choice (e.g. if you know you are only around for a couple of days, there's no point breaking out more than a pint or so).
Wednesday, 22 April 2009
Managing and syncing two iTunes libraries with Tuneranger
I finally adopted iTunes after many years of fiddling about. However, one thing that was easy beforehand was backing up my collection. Since I had little to no dependence on any of the applications I was using for sorting and managing my collection, I simply backed up all my files. The organisation was in the folder taxonomy.
However, once I adopted iTunes and allowed it to manage my music collection, I also found that I started building playlists (even smart playlists!) and tracking my playcount, dates last played, dates imported and my track ranking. Unfortunately, none of this particular data is stored in the ID3 tag of the individual tracks and hence just taking a copy of the files was not a solution. It is what is called metadata and is carried in the iTunes library files that sit in your chosen iTunes folder location:
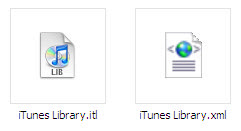 Therefore, I figured it was a simple case of copying the iTunes files as well to do a backup. This would be a good solution for anyone else backing up a single instance of iTunes, but as with many things, I wanted to make it more complex...
I listen to music at home, at work and on my iPhone. I like having my entire collection with me, so the 16GB my iPhone affords is not enough (although I will cover the excellent Simplify iPhone application in due course which allows me to listen to anything in my collection wherever I have a connection of any type). The issue that this brings is that the two iTunes libraries quickly get out of sync and start diverging. I add music to one of the libraries, but I accrue listening and rating data on both of them, along with playlist building and so on.
What I needed was a way that I could sync the two iTunes libraries so that I did not lose my listening stats and other meta data. I looked for a while on the net and tried a couple of options, but the only one that really solved my problem was an application called Tuneranger by Acertant. It's not free, but is pretty cheap and has a 30 day trial which I used to check if it fit the bill.
 This program does exactly what I wanted and has been successful enough for me to plump and buy it. There are a few caveats I should point out, though:
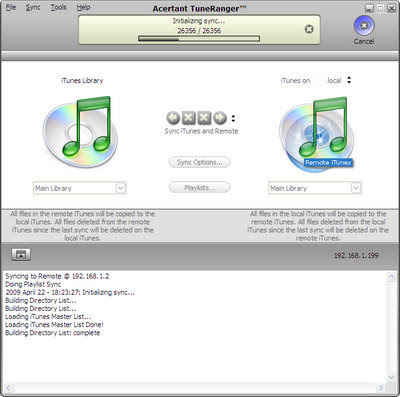
Here's a screenshot of Tuneranger in progress:
I would definitely give it a shot if you have two libraries that you don't want to lose the metadata on. For a fresh start with two (or more) unique libraries, follow these steps:
1. Back up any libraries before you start
2. Make a first run that syncs both libraries fully together into one master
3. Designate one of the libraries as a master and only add music to this library
4. After sufficient listening (say once a month) sync the secondary library's metadata to the master
5. Check the master for any duplicates (there shouldn't be any if you haven't fiddled with the tags on either library, except for new tracks)
6. Replace the secondary iTunes library with a direct copy of the master
7. Go to step 4 and repeat
However, once I adopted iTunes and allowed it to manage my music collection, I also found that I started building playlists (even smart playlists!) and tracking my playcount, dates last played, dates imported and my track ranking. Unfortunately, none of this particular data is stored in the ID3 tag of the individual tracks and hence just taking a copy of the files was not a solution. It is what is called metadata and is carried in the iTunes library files that sit in your chosen iTunes folder location:
 Therefore, I figured it was a simple case of copying the iTunes files as well to do a backup. This would be a good solution for anyone else backing up a single instance of iTunes, but as with many things, I wanted to make it more complex...
I listen to music at home, at work and on my iPhone. I like having my entire collection with me, so the 16GB my iPhone affords is not enough (although I will cover the excellent Simplify iPhone application in due course which allows me to listen to anything in my collection wherever I have a connection of any type). The issue that this brings is that the two iTunes libraries quickly get out of sync and start diverging. I add music to one of the libraries, but I accrue listening and rating data on both of them, along with playlist building and so on.
What I needed was a way that I could sync the two iTunes libraries so that I did not lose my listening stats and other meta data. I looked for a while on the net and tried a couple of options, but the only one that really solved my problem was an application called Tuneranger by Acertant. It's not free, but is pretty cheap and has a 30 day trial which I used to check if it fit the bill.
 This program does exactly what I wanted and has been successful enough for me to plump and buy it. There are a few caveats I should point out, though:
- You cannot have the two iTunes libraries connected to the same computer - they must be network connected libraries. This is a downside as it would be far more useful just to plug two external hard drives into one computer and do it that way.
- You have to be patient! Since everything is done over the network, it can take a long time to do the scan before the sync. For example, my 25,000 track strong collection syncing across two libraries (i.e. scanning around 50,000 tracks) takes about 15 to 20 hours. That's before any of the actual synchronisation even happens.
- Because of the point above, it is difficult to experiment with the tool to see how it all works and what the results are. If you want to test a few options, you are talking days rather than minutes or hours.
- If you are not careful and you change the ID3 tags on one side and not the other, they are likely to be regarded as separate tracks. Therefore you will end up with some duplication. I would recommend making sure you have a perfectly tagged collection before starting using Tuneranger. See this post on tagging with MediaMonkey and this post on getting your tags normalised to get yourself up to speed.
- It can be a little buggy, which means starting all over again - humbug! It seems to be very sensitive to the network and iTunes. Correspondingly, if iTunes goes, Tuneranger will go.
Here's a screenshot of Tuneranger in progress:

I would definitely give it a shot if you have two libraries that you don't want to lose the metadata on. For a fresh start with two (or more) unique libraries, follow these steps:
1. Back up any libraries before you start
2. Make a first run that syncs both libraries fully together into one master
3. Designate one of the libraries as a master and only add music to this library
4. After sufficient listening (say once a month) sync the secondary library's metadata to the master
5. Check the master for any duplicates (there shouldn't be any if you haven't fiddled with the tags on either library, except for new tracks)
6. Replace the secondary iTunes library with a direct copy of the master
7. Go to step 4 and repeat
Tuesday, 21 April 2009
MediaMonkey scripts to make your mp3 tags consistent
Hi there all you Lifehacker visitors! Thanks for popping into the Tippopotamus.
If you enjoy this post, you might also like this one on getting lyrics into iTunes the easy way and this one on how to process new music.
I [will be posting later this week] have now posted on music genre tagging and how it can be used to structure your listening.
I hate it when tags don't match up. For example, depending on where your tag data has come from you could end up with a host of different artist names:
- Guns and Roses
- Guns n Roses
- Guns N Roses
- Guns 'n' Roses
- Guns 'n Roses
- gunsnroses
- GnR
- GnFR
There are a plethora of different things that can be wrong with tags - missing track numbers, no album art, volumes and disc numbers - the list goes on. These bother me, but may not irk you. If you are like me, correcting this sort of mess is something that would require a lot of manual tagging work, since finding the files is difficult and correcting them is a labourious process.
Or so I thought.
MediaMonkey comes with a few built-in functions and scripts that can help you to tame your mp3 collection. However, the real power comes in the scripts nice people have written to solve tagging problems. Here follows a synopsis of what I have found useful…
 1. Built-in MediaMonkey Features
Firstly, you can search for missing data very easily. Under Library -> 'Files to Edit'...

...you can find folders that will display all tracks with:
- Unknown Title
- Unknown Artist
- Unknown Album
- Unknown Genre
- Unknown Year
- Unknown Rating
- Unknown Album Art
These are great for finding tracks and albums that need to be tagged. Follow my previous post that shows you how to tag tracks using MediaMonkey to get these all sorted.
2. Built-in MediaMonkey Scripts
Next, MediaMonkey has a couple of built-in scripts that can help with some menial tasks. These are found under Tools -> Scripts.

Auto-increment Track #s
This one takes the tracks you have highlighted in the main window and gives you the opportunity to number the tracks in chronological order, starting at a track number you specify.
This is useful when the tag editor your have used to automatically tag your mp3 album has used a different version (e.g. US to UK) which has bonus tracks missing or tracks in a different order. This script helps sort this out without having to try and find the UK version of the album or re-numbering the files manually.

Swap Artist and Title
I find that automatic tagging sometimes uses data that has the artist and track title inverted. This script simply swaps them around. Believe me, I wish I had found this one earlier as I have wasted enough of my life swapping these manually.
3. User Created MediaMonkey Scripts and Plug-ins
The real powerhouses for getting your collection tagged nicely are these three scripts that MediaMonkey fans with the skills-to-pay-the-bills have written specifically to help out. There are many more out there, but after extensive searching, these are the ones I found to be the best:
'Find Missing The' script by Trixmoto
This will search through all the tracks you have in the main window (I make sure I have my whole collection displayed) and finds where you have artists with 'The' in front in some cases and without in others. It also looks for those that have a comma and The (i.e. ', The') as a suffix. It brings up a confirmation box before you have to accept the changes. This was useful for bands like The Beatles which I had in three different ways ('The Beatles', 'Beatles' and 'Beatles, The').
A word of caution, though - it also looked through the track title fields as well and where a song name matched an artist that needed changing, it also wanted to change the track title (e.g. 'The Jam' as a band and the track 'Jam' by Michael Jackson resulted in the track being renamed 'The Jam'. this required a little bit of remedial work to correct these track names, but a lot less than correcting all the missing 'The's in my collection.
The detailed description can be found here and the download can be found here.
'Case and Leading Zero Fixer plug-in by Bex
This plug-in is hugely useful in getting your upper-case and lower-case use in sync with each other. I used it mainly for its secondary function, namely adding or removing leading zeroes to the track number. It was by far the simplest way to do this and made everything look nicer in iTunes. Once installed, this one is found under Tools -> Options -> Library -> Case & Leading Zero Fixer.

A full guide on its use can be found in the MediaMonkey forums here. The download is here.
'Tagging Inconsistencies' plug-in by Bex
This is the grandaddy of them all and is the one you can't do without. It's a bit too complicated to explain all here, but suffice to say, it does what it says - it fixes tagging inconsistencies. It searches for inconsistencies by Album, Folder, Person, Track and Genre and retuns them for you to correct. The correction must be done manually, but believe me, 99% of this particular job is finding what needs correcting. If you think you have a beautifully tagged collection, run it through this and you will be surprised!
When it has been installed, the 'nodes' it uses to retun the inconsistencies can be found under your tree on the left hand pane of MediaMonkey: Library -> Files to Edit -> Tagging Inconsistencies.

Again, there is no point in me writing a huge guide for this as there is plenty of information on the MediaMonkey forums here. However, I found that the most useful way of learning how to use this was to actually just get into it and start experimenting. The download can be found here.
As a post-note, I would always suggest backing up your collection before you start on a festival of tag editing. You never know if something might go wrong or if you might prefer to have it the way you previously wanted it. I have never had a disaster, but there again, I tried and tested these on a duplicate before I got into using them properly. Good luck!
Monday, 13 April 2009
Spotify - will this revolutionise the way we listen to music?
I recently found our about Spotify. It is potentially a revolutionary new idea for how we listen to music. The premise is simple - instead of owning all your mp3 files and storing them yourself, Spotify streams them all to you. You don't need to actually own any music or pay anything and once you have installed the software you have access to almost any music out there. The quality is good - 160 kbps, if my memory serves me right and if your bandwidth is not cluttered, the reaction time was almost instantaneous.
This could make owning music a thing of the past and all the work I have done keeping my collection neatly tagged and organised rather futile. I checked it out for a little-known band I liked at school and was pleasantly surprised to see it included. However, The Beatles and Led Zeppelin were not and it didn't have the track I wanted to listen to by the Red Hot Chili Peppers. Never mind - still very impressive.
I have tried services like Last.fm before, but was unimpressed by the fact I could only listen to music like the track I wanted. Spotify lets you listen to complete albums and compilations - new ones too. This is more like what I wanted. Now I will just be waiting for their iPhone application to come out - that would be the icing on the cake.
Suffice to say, I will be watching Spotify closely and with baited breath.
Bulldog clip as money clip
I used to use a regular money clip to hold my cash and credit cards. I found that when you have a big wad of notes and four or five credit cards, it becomes overfilled and everything pops out. As you spend your money, you eventually get a to a sweet spot where everything fits nicely. You then start running out of money and it all gets a bit loose. The only way to deal with this was to keep bending the clip as the wad changed size.
I read this tip in lifehacker a while back about money clips. Basically, after a bit of tinkering, you would end up with a money clip that could hold some flat keys as well. I'm a little lazier than that and hence would never bother with making something, but I liked one piece of this post, namely the bulldog clip.
After reading this post, I put aside my nice Tiffany money clip and got all utilitarian. I took the basic element and simply used a bulldog clip instead. The beauty of this is that you can choose the size you want depending on the amount of cards and cash you like to carry around with you and then it adapts nicely as you spend and draw out cash. It is far superior to a simple money clip!

It also costs next to nothing. Long live the bulldog clip!
Thursday, 9 April 2009
Converting to mp3 with dBpoweramp
IMHO, by far the easiest way to convert tracks to mp3 is to use dBpoweramp. It a no-fuss piece of software that integrates with your context (right click) menu. I tend to opt for open-source software, but this is one I decided to pay for as its functionality is simple and effective.
After you have installed the software (there is a 30 day trial and the free version will convert a number of formats, but not *.wma files) you must make sure you have the right codecs installed. You do this by visiting the dBpoweramp 'Codec Central'. Here you can get the requisite codecs for whatever file type you need to convert from and to. I have the following installed:
1. Navigate to any tracks and context click on them (you can select multiple tracks if you want to convert a whole album. Select 'Convert To':
 2. You can then select the file type you want to convert to from the drop down menu:


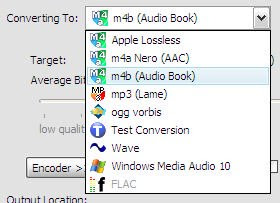
I always choose 'mp3 (Lame) here for my music, unless I am converting an audio book, in which case I choose 'm4b (Audio Book)' which remembers the position I am at when I listen to them on my iPhone.
3. Next, I always check the bit rate of my source files. This can sometimes be done with a context click on the file in question and searching its properties (right click on the file and choose Properties, the pick the Summary tab).
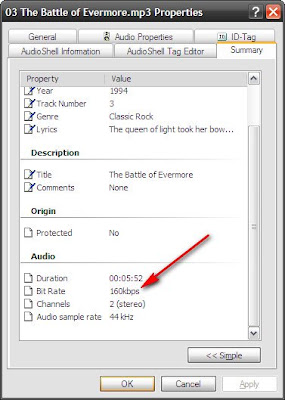 For some file types, this may not be populated. Hence, I sometimes actually go about converting a single track a few times with different bitrates until I see an approximately similar file size. There are probably simpler ways to do this, but it only usually takes one or two goes.
4. I then choose this bitrate using the slider on the dBpoweramp window so that it matches the source file. dBpoweramp can apparently do conversions between formats without loosing any of the quality that it is already compressed at, hence it's always important to choose the same bitrate or less.
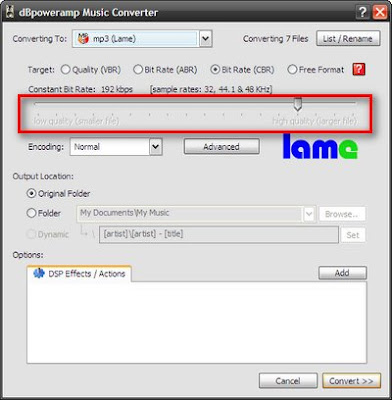
5. I make sure the output location is set to 'Original Folder' - this makes the tracks easy to find as they will be right next to the source files
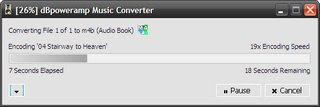
6. Press 'Convert' at the bottom right of the window to start the processing
 All the files you selected will then be converted to mp3, retaining all their original tags and file naming.
After I have done this, I follow the rest of my process for tagging and commissioning my music.
After you have installed the software (there is a 30 day trial and the free version will convert a number of formats, but not *.wma files) you must make sure you have the right codecs installed. You do this by visiting the dBpoweramp 'Codec Central'. Here you can get the requisite codecs for whatever file type you need to convert from and to. I have the following installed:
- mp3
- m4a
- m4b
- Wave
- Ogg Vorbis
- Windows Media Audio
1. Navigate to any tracks and context click on them (you can select multiple tracks if you want to convert a whole album. Select 'Convert To':
 2. You can then select the file type you want to convert to from the drop down menu:
I always choose 'mp3 (Lame) here for my music, unless I am converting an audio book, in which case I choose 'm4b (Audio Book)' which remembers the position I am at when I listen to them on my iPhone.
3. Next, I always check the bit rate of my source files. This can sometimes be done with a context click on the file in question and searching its properties (right click on the file and choose Properties, the pick the Summary tab).
 For some file types, this may not be populated. Hence, I sometimes actually go about converting a single track a few times with different bitrates until I see an approximately similar file size. There are probably simpler ways to do this, but it only usually takes one or two goes.
4. I then choose this bitrate using the slider on the dBpoweramp window so that it matches the source file. dBpoweramp can apparently do conversions between formats without loosing any of the quality that it is already compressed at, hence it's always important to choose the same bitrate or less.

5. I make sure the output location is set to 'Original Folder' - this makes the tracks easy to find as they will be right next to the source files

6. Press 'Convert' at the bottom right of the window to start the processing
 All the files you selected will then be converted to mp3, retaining all their original tags and file naming.
After I have done this, I follow the rest of my process for tagging and commissioning my music.
iTunes compilations and Album Artist
In a bid to make large music collections more manageable, iTunes introduced a tag called 'Part of a compilation'. On reading around, some people love it, some people hate it. I happen to really like it since I have a plethora of compilation and soundtrack albums.
Chronologically, I would have already passed my tracks through MediaMonkey to get to this stage. Details on how to do this are shown on this post and the overall process I use for tagging can be read here.
Chronologically, I would have already passed my tracks through MediaMonkey to get to this stage. Details on how to do this are shown on this post and the overall process I use for tagging can be read here.
The 'Part of a compilation' tag makes searching for music a lot easier and practical because iTunes essentially ignores the artist field for compilations in its tabular format. This means every track that is tagged with this is grouped together by Album rather than by Artist and all your compilations show up in one group rather than scattered through the huge table.

Coupled with a well populated Album Artist field, searching your iTunes library becomes a doddle. I tag most of my compilations with Album Artist as 'Various Artists' unless there is a specific DJ or host for the album.

A useful point to note here is how to edit multiple tracks at one time - i.e. to tag a whole album as 'Part of a compilation' and with the same Album Artist. It seems like a simple step, but it took me a while to find it.
1. Highlight all your album's tracks by left clicking on the first track and the holding down Shift and clicking on the last track

2. Right click anywhere within the highlighted tracks and pick 'Get Info' from the context menu

3. Add your 'Album Artist' on the first tab called 'Info'

4. Choose the tab called 'Options'

5. Change the dropdown box named 'Part of a compilation' to 'Yes' (the check box automatically checks when this is changed)

6. Press 'OK'
Your album will now have an Album Artist and be noted in iTunes as part of a compilation. What this physically does to your files (if you have iTunes manage your music automatically) is to move them from separate artist folders into an album folder instead. If you need to find the tracks, you can locate the album folder under another folder called 'Compilations' which is, in turn, under your main iTunes library folder.
The major things doing this improved for me are as follows:
- I can easily sort my iTunes library in the List view as I can now sort by album, artist and album artist.
- When using the iTunes Browser (Ctrl-B), I don't get a huge and unwieldy list of artists - I only get my normal albums. At the top of the artist box in the browser is 'Compilations' which lets me go right into them so I don't miss anything
- My iTunes music folder is much easier to browse if I am trying to find a piece of music to share with someone or to transfer somewhere (beforehand, compilations were split into multiple artist folders)
Tuesday, 7 April 2009
Everyday tagging with MediaMonkey
MediaMonkey is IMHO the best tag editor out there. It's not necessarily as good looking as iTunes, but for bulk tagging of new tracks, it can't be beaten. 
In my introductory post on dealing with new music, I showed the process involved in getting new tracks from the moment you get them to finally having them in iTunes with the rest of your library. This one will deal with the individual steps within MediaMonkey, but assumes you have read that post in order to get to this point.
The tag editing works on an album-by-album basis (or track-by-track for single songs)...
1. Click on the your album folder in the tree on the left hand side

2. In the main pane on the right, highlight all the tracks in the album by using Edit --> Select All or the keyboard shortcut Ctrl-A.

3. Right click on any track and select 'Auto-Tag from Web' on the context menu. You can use the keyboard shortcut Ctrl-L if you prefer.

This brings up a new window.
4. Depending on the popularity of the album you are looking up you may get immediate results. I find I often need to hone the search a little. I do this by typing something more specific about the artist in the search box at the top left of the screen.
Here is an example after trying to tag 'Hotel Costes, Vol.8'. MediaMonkey went straight for the album artist, which returned no results:

By typing in 'Hotel Costes 8' I immediately got some results:

You can choose the best fitting results by looking through the search results with the dropdown function on the search box. In this case, only one result was returned. You can often find better album art and artist commnetary if you browse through a little bit.
5. Make sure you have all the checkboxes ticked to start with. Anything in your track tags that will change is highlighted in bright yellow so that you don't miss it.

6. Do a good check of the data that is going to be changed to make sure you are happy with it. Worth checking here are:
- The right number of tracks
- Are tracks names and artist names interchanged (this sometimes happens with compilations)?
- Are track names and artist names combined in the same field (again a problem with compilations sometimes)?
- Are the track numbers changing significantly?
Most of these can be changed manually after you have been through this step, but if there is another search result that gives a better fit, it will save you time.
7. Press the 'Auto-Tag' button at the bottom right (or press 'Close' if you don't want to accept the tag results).

8. You should now be back in the main MediaMonkey window. Check the results again to see if you need to do any manual correcting. I often do a little bit of tweaking so that the results fit with my naming convention in iTunes (e.g. for Volumes and First Name-Last Name etc.). You can do this by right clicking on individual or multiple tracks if you want to edit information for all the tracks together) and choosing 'Properties' at the bottom.

You are presented with a new window showing all the available fields to populate. Notice the tabs at the top which give more options. Specifically, if you could not get results with album art and you have managed to find a jpeg elsewhere, you can embed it in the tag using the tab called 'Album Art'.

9. At this point, I used to go ahead and rename the files with the 'Auto-Organize Files' context click or the keyboard shortcut Ctrl-R, but I no longer do this as I have iTunes manage my files. It is actually a great relief as I eventually realised I never used the filenames for searching. I only ever used my folders and now I just use iTunes. If you are an mp3 file naming convention junkie, like I was, you can go to town with this function, but I would strongly suggest asking yourself if it is actually worth the time and effort…
That's it - that's all I do to commission files within MediaMonkey. Unfortunately this is where I unceremoniously dump the singing simian. There are some other whole-library tagging adventures I have had with MediaMonkey that I was very impressed with, but I will post about those in the future as they are gargantuan one-off efforts. This should allow you to get quality and consistently tagged tracks feeding into your collection, regardless of the software you use to play your music with.
Subscribe to:
Posts (Atom)


